介绍
three.js 点材质/粒子效果
# 几何物体的点
- 一般物体是通过顶点进行相连形成的 通过.wireframe (opens new window) 可以将几何体渲染成线框(即渲染为平面多边形)
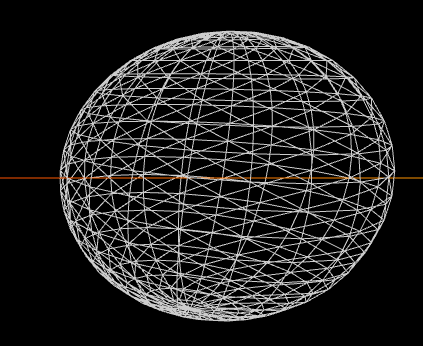
举个球体例子
- 比如一个球体就是通过顶点相连的分段形成的
// 设置场景
const scene = new THREE.Scene()

// 声明一个球体
const sphere = new THREE.SphereGeometry(3, 20, 20)

// 声明一个标准材质
const mmaterial = new THREE.MeshStandardMaterial({
  // 开启线框模式
  wireframe: true,
})

// 创建网格模型
const mesh = new THREE.Mesh(sphere, mmaterial)
// 添加到场景
scene.add(mesh)
- 开启线框的效果
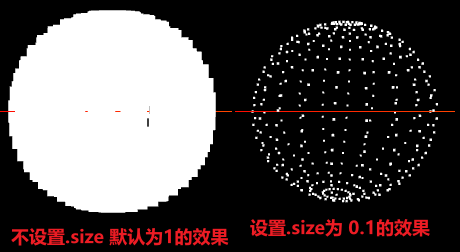
# Points点物体
Mesh (opens new window) 网格可以生成一个网格模型 Points (opens new window) 是点物体 生成的是一个由顶点构成的物体 也就是没有连线线框效果的物体
Points点物体要搭配 PointsMaterial (opens new window) 点材质才能生成- .size (opens new window) 设置点的大小(类型
Number)。默认值为1.0默认值非常大 需要手动调整点的大小 比如0.1 - .color (opens new window) 设置点的颜色
- .sizeAttenuation (opens new window) 指定点的大小是否因相机深度而衰减。(仅限透视摄像头)默认为
true。为false点的大小固定 不会随着镜头改变大小
- .size (opens new window) 设置点的大小(类型
举个球体例子
- 声明了一个球体 给其设置为点材质
// 设置场景
const scene = new THREE.Scene()

// 声明一个球体
const sphere = new THREE.SphereGeometry(3, 20, 20)

// 创建点材质
const pmaterial = new THREE.PointsMaterial({
  color: 0xffffff,
  size: 0.1,
})

// 创建点模型
const points = new THREE.Points(sphere, pmaterial)
points.position.set(5, 0, 0)

// 添加到场景
scene.add(points)
- 展示效果
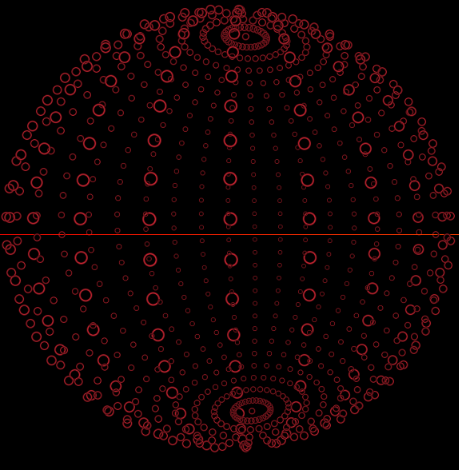
# 创建点材质贴图/材质效果
可以通过
TextureLoader()贴图加载器 加载一些贴图 并且设置一些贴图的属性 让其透明并且可以穿透贴图图片

// 导入点材质
import PointMaterial from '@/assets/particles/2.png'

// 声明一个球体
const sphere = new THREE.SphereGeometry(3, 30, 30)
// 声明一个标准材质
const mmaterial = new THREE.MeshStandardMaterial({
  // 开启线框模式
  wireframe: true,
})

// 设置场景
const scene = new THREE.Scene()

// 创建网格模型
const mesh = new THREE.Mesh(sphere, mmaterial)
mesh.position.set(15, 0, 0)
// 添加到场景
scene.add(mesh)

// 创建材质贴图加载器
const loader = new THREE.TextureLoader()
// 加载点材质贴图
const texture = loader.load(PointMaterial)

// 创建点材质
const pmaterial = new THREE.PointsMaterial({
  color: '#ff3040',
  size: 0.2,
  transparent: true, // 开启透明度
  map: texture, // 设置贴图
  alphaMap: texture, // 设置透明贴图
  depthWrite: false, // 关闭深度写入(防止点被遮挡)
  blending: THREE.NormalBlending, // 设置混合模式 AdditiveBlending为叠加 NormalBlending 为正常(默认值)
})
// 创建点模型
const points = new THREE.Points(sphere, pmaterial)
points.position.set(5, 0, 0)
// 添加到场景
scene.add(points)
- 展示效果
# 创建星空效果
- 通过BufferGeometry (opens new window) 创建星星的缓冲几何体 设置其
position位置和color颜色的属性值 通过new THREE.BufferAttribute() (opens new window) 储存BufferGeometry相关的属性值 然后通过.setAttribute (opens new window) 设置星星的position位置和color颜色的属性值 再配合for循环生成多个星星的BufferGeometry缓冲几何体 添加到Points (opens new window) 点材质中 最后将点材质添加到Scene (opens new window) 场景中
// 导入three.js
import * as THREE from 'three'
// 导入轨道控制器
import { OrbitControls } from 'three/examples/jsm/controls/OrbitControls'
// 导入点材质
import materialTexture from '@/assets/particles/1.png'
export class CreateWorld {
  constructor(canvas: any) {
    // 接收传入的画布Dom元素
    this.canvas = canvas
  }
  canvas!: any
  // 设置动画id
  animationId!: number
  // 创造轨道控制器
  controls!: any
  // 设置渲染器
  renderer = new THREE.WebGLRenderer({
    antialias: true // 开启锯齿
  })
  // 设置场景
  scene = new THREE.Scene()
  // 设置相机
  camera = new THREE.PerspectiveCamera(
    // 视觉角度
    75,
    // 相机纵横比 取整个屏幕 宽 / 高
    window.innerWidth / window.innerHeight,
    // 相机的进截面 (近距离不可见范围)
    0.1,
    // 远截面 (远距离不可见范围)
    1000
  )

  // 创建场景
  createScene() {
    // 设置相机的所在位置 通过三维向量Vector3的set()设置其坐标系 (基于世界坐标)
    this.camera.position.set(0, 5, 10) // 默认没有参数 需要设置参数

    // 创建贴图材质加载器
    const textureLoader = new THREE.TextureLoader()

    const material = textureLoader.load(materialTexture)
    // 设置星星的数量
    const starCount = 5000
    // 创建星星的几何体
    const starGeometry = new THREE.BufferGeometry()
    // 创建星星的材质
    const starMaterial = new THREE.PointsMaterial({
      size: 0.3,
      map: material,
      alphaMap: material,
      transparent: true, // 开启透明度
      depthWrite: false, // 关闭深度写入(防止点被遮挡),
      vertexColors: true // 开启顶点颜色 (默认为false) 顶点颜色是指每个顶点都有一个颜色值(默认色值) 顶点颜色的优先级高于材质颜色(通过.color设置的颜色) 顶点颜色的值是一个0-1的值 0表示黑色 1表示白色
    })

    // 创建星星的位置数组 通过Float32Array创建一个数组 用来存放星星的位置
    const starPositions = new Float32Array(starCount * 3) // 3个坐标系 所以需要数量*3
    // 设置星星的颜色
    const starColors = new Float32Array(starCount * 3) // 3个颜色 所以需要数量*3 RGB(0~1, 0~1, 0~1)

    // 设置星星的位置/顶点 通过for循环遍历星星的数量 再通过Math.random()随机设置星星的positions位置属性
    for (let index = 0; index < starPositions.length; index++) {
      starPositions[index] = (Math.random() - 0.5) * 50 // -0.5 ~ 0.5 之间的随机数 * 100
      starColors[index] = Math.random() // 0 ~ 1 之间的随机数
    }

    // 设置星星的位置属性
    starGeometry.setAttribute(
      'position', // 设置位置属性
      new THREE.BufferAttribute(starPositions, 3) // 设置位置属性的值 3个坐标系 3个为一组
    )
    // 设置星星的颜色属性
    starGeometry.setAttribute('color', new THREE.BufferAttribute(starColors, 3))

    // 创建星星
    const star = new THREE.Points(starGeometry, starMaterial)
    // 将星星添加到场景中
    this.scene.add(star)

    // 环境光
    const light = new THREE.AmbientLight(0xffffff, 0.5) // soft white light
    this.scene.add(light)

    // 创建一个辅助线
    const axesHelper = new THREE.AxesHelper(20)
    this.scene.add(axesHelper)

    // 设置渲染器(画布)的大小 通过setSize()设置
    this.renderer.setSize(window.innerWidth, window.innerHeight) // setSize(画布宽度, 画布高度)
    // 将webgl渲染到指定的页面元素中去 (比如body 也可以设置其他页面Dom元素)
    this.canvas.appendChild(this.renderer.domElement)

    // 创建创建一个轨道控制器 实现交互渲染
    this.controls = new OrbitControls(this.camera, this.renderer.domElement) // new OrbitControls(相机, 渲染器Dom元素)
    // 设置控制器阻尼 让控制器更真实 如果该值被启用,你将必须在你的动画循环里调用.update()
    this.controls.enableDamping = true

    // 设置闹钟
    const clock = new THREE.Clock()

    // 创建更新动画的方法
    const render = () => {
      // 获取时间差
      const time = clock.getElapsedTime()
      // 让物体旋转起来
      star.rotation.x = time * 0.3
      star.rotation.y = time * 0.2
      // 设置阻尼感必须在动画中调用.update()
      this.controls.update()
      // 使用渲染器,通过相机将场景渲染出来
      this.renderer.render(this.scene, this.camera) // render(场景, 相机)
      // 使用动画更新的回调API实现持续更新动画的效果
      this.animationId = requestAnimationFrame(render)
    }
    // 执行创建更新动画的方法
    render()

    // 实现画面变化 更新渲染的内容
    window.addEventListener('resize', () => {
      // 解构window对象
      const { innerWidth, innerHeight, devicePixelRatio } = window
      // 更新相机的宽高比
      this.camera.aspect = innerWidth / innerHeight
      // 更新摄像机的投影矩阵
      this.camera.updateProjectionMatrix()
      // 更新渲染器
      this.renderer.setSize(innerWidth, innerHeight)
      // 更新渲染器的像素比
      this.renderer.setPixelRatio(Math.min(devicePixelRatio, 2))
    })
  }

  // 销毁渲染内容
  dispose() {
    // 清除渲染器
    this.renderer.dispose()
    // 清除轨道控制器
    this.controls.dispose()
    // 清除动画
    cancelAnimationFrame(this.animationId)
  }
}
- 在Vue中使用
<template>
  <div>
    <div ref="stateDom" />
  </div>
</template>
<script setup lang="ts">
// 导入Vue3的API
import { ref, onMounted, onBeforeUnmount } from 'vue'
//导入绘制和销毁
import { CreateWorld } from './components/sky_renderer'

// 获取Dom
const stateDom = ref()
// 储存three.js的实例
let Three: any = null

onMounted(() => {
  // 创建three.js实例
  Three = new CreateWorld(stateDom.value)
  // 传递页面Dom 绘制three.js
  Three.createScene()
})

onBeforeUnmount(() => {
  // 销毁three.js实例
  Three.dispose()
})
</script>
<script lang="ts">
export default {
  name: 'StartSky'
}
</script>
<style lang="scss" scoped></style>